
How To Stop Your Brompton Seatpost from Slipping
Have you got a sinking feeling that your saddle isn’t the same height at the end of the ride as when you started?
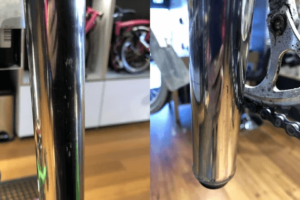
There’s a really easy way to check. Grab a marker pen and draw a line on your seatpost just above the frame. Repeat this at the end of the ride.

Raise the seatpost so you can see both lines – if there is a noticeable gap between the two (as shown in the photo on the right), then read on!
Step 1 – Clean Your Seatpost
Your Brompton seatpost is designed to work best when clean – really clean. While yours may look clean at a glance, your seatpost can easily acquire a film of natural oils from your hands (even if when you’ve just washed them), dirt and dust from the environment, and bits of plastic from the seatpost sleeve.
This one definitely needs a clean:

Here at Brompton Junction we use isopropyl alcohol with a clean rag to clean seatposts – you can find this as Isocol rubbing alcohol in chemists and supermarkets, or use a disc brake cleaner from hardware or automotive stores. We recommend these over other products as they will clean without leaving residue on the seatpost. Don’t have a clean rag handy? Use a fresh kitchen/paper towel.
You can also remove your saddle, drop your seatpost out from below, and clean inside the seat tube.
If this doesn’t have the desired effect and you’re still sinking, proceed to step 2.
Step 2 – Tighten the Quick Release Clamp
It’s very easy to go too far with this step and potentially damage your frame, so be patient.
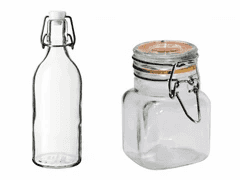 Firstly, let’s briefly explain how the quick release (“QR”) clamp should work. In principal, the QR clamp on your seatpost is very similar to the flip top or bail closure on your glass water bottle or jars at home. To secure the the lid you need to press the lever all the way home. At first there’s increasing resistance, and then it snaps into place!
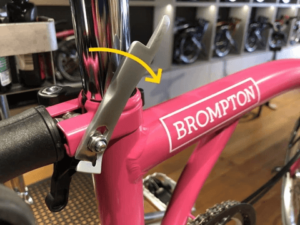
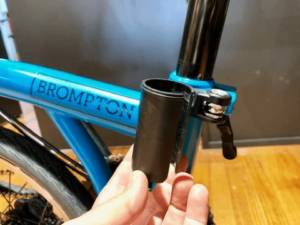
It’s the same on your Brompton. Instead of pulling a lid closed, lever of your QR clamp is pulling your frame tight around your seatpost. Between the frame and the seatpost is a plastic sleeve that acts like the rubber seal on the jar shown above – you can just spot this black sleeve in the image below:

If your QR clamp isn’t tight enough, it will be very easy to open and close, even if you’re hearing and feeling the ‘snap’ as the lever closes fully against the frame. In this case, gradually tighten the nylock nut on the right hand (drive) side using a 10mm spanner (the one from your Brompton Toolkit works well) – just 1/4 of a turn at a time until the lever action is not more than quite firm and will still close against the frame.
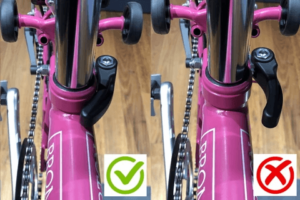
As with the glass jar examples above, you shouldn’t need to use two hands to open or close the QR clamp. Also ensure that the ‘snap’ action isn’t lost – that’s an indication that you’ve over-tighten the nut and that the slipping might be due to another cause.
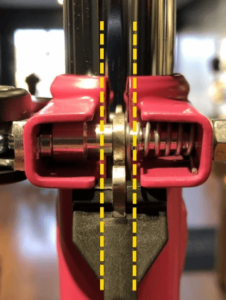
If the nut is over-tightened, it can start to distort the rear of the main frame; the sides of the frame here must remain parallel when the QR is tightened for the seatpost sleeve to remain effective and to prevent irreversible damage to the frame.
Step 3 – Seatpost Sleeve Replacement
If you have followed the first two steps and your seatpost is still slipping, you could well need a new seatpost sleeve.
The seatpost sleeve is a plastic (nylon) sheath inserted into the seat tube of the main frame. Not only does it hold you up when you ride but also allows the seatpost to slide up and down easily every time you fold and unfold your Brompton.
Your seatpost sleeve is a wearable part; how often you need to have yours replaced will depend on a few factors such as: how often you fold your bike, how tall you are, how much time you spend in the saddle, how clean you keep your seatpost. Some Brompton riders are surprised to be told they need their seatpost sleeve replaced after 5+ years of usage, where as some riders need their seatpost sleeve replaced yearly!
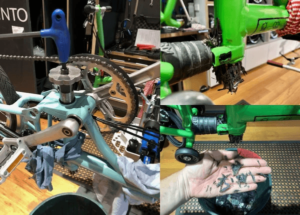
We definitely recommend making a booking with us if your Brompton needs a new seatpost sleeve. In order for your seatpost to slide up and down easily it’s best to ream the new sleeve to the correct size once fitted. Here’s what the reaming process looks like:
What Now?
As mentioned above, keeping your seatpost from slipping is usually a combination of regularly cleaning, checking the tension of the QR clamp by gently tensioning the nylock nut (if needed), or booking your Brompton in to have your seatpost sleeve replaced.
Occasionally we may recommend customers need a new seatpost if theirs is excessively worn, bent or otherwise damaged. QR clamps may need replacing due to wear or over-tightening. This advice is provided on a case-by-case basis by one of our experienced mechanics.