To improve the performance and enjoyment of your Brompton Electric, Brompton Bicycle are providing owners with two replacement parts for their Brompton Electric bikes:
Replacement frame catch for their Essential Bag (and City Bag as required). This will help ensure a more secure connection.
Replacement front mudguard stay and flap. This will prevent rubbing of the front tyre against the stay.
We are in the process of inviting our customers to make appointments to have these parts fitted in store where possible. For customers who are not easily able to make it in to our store, below are instructions on how to fit these replacement parts yourself.
Fitting the replacement frame catch
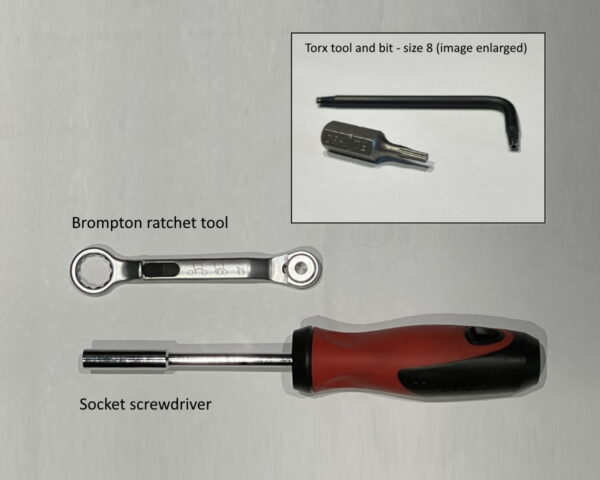
You will need a Torx size 8 tool (T8) to access the catch. Shown below are examples of a T8 tool, a T8 bit and tools compatible with the bit.
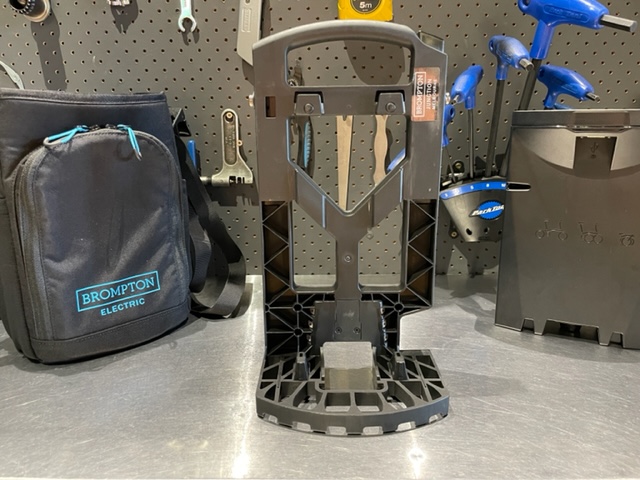
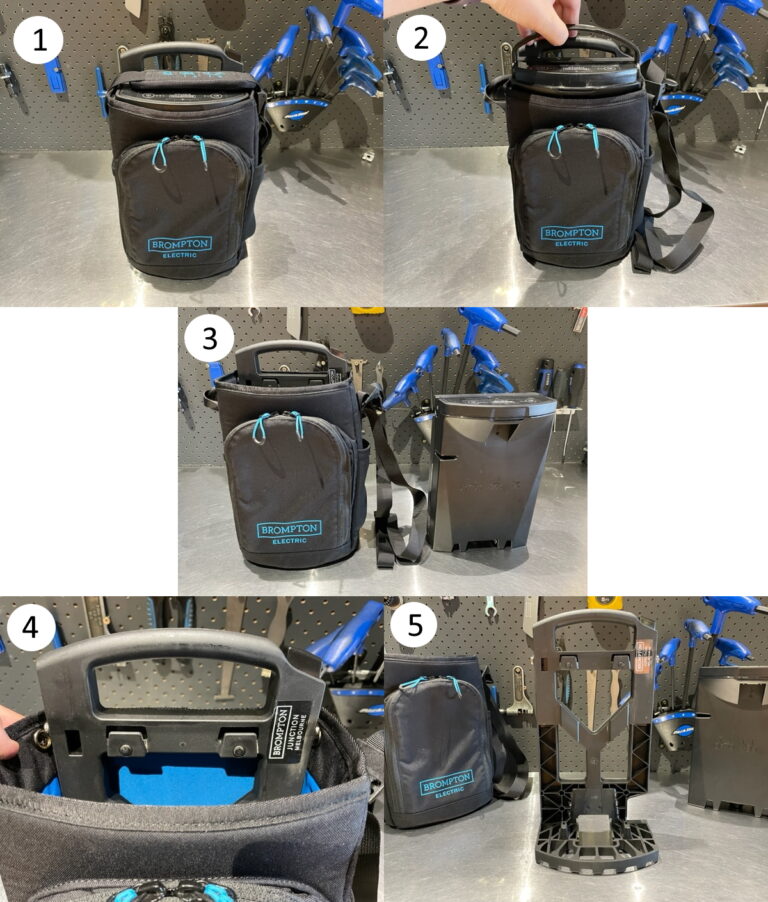
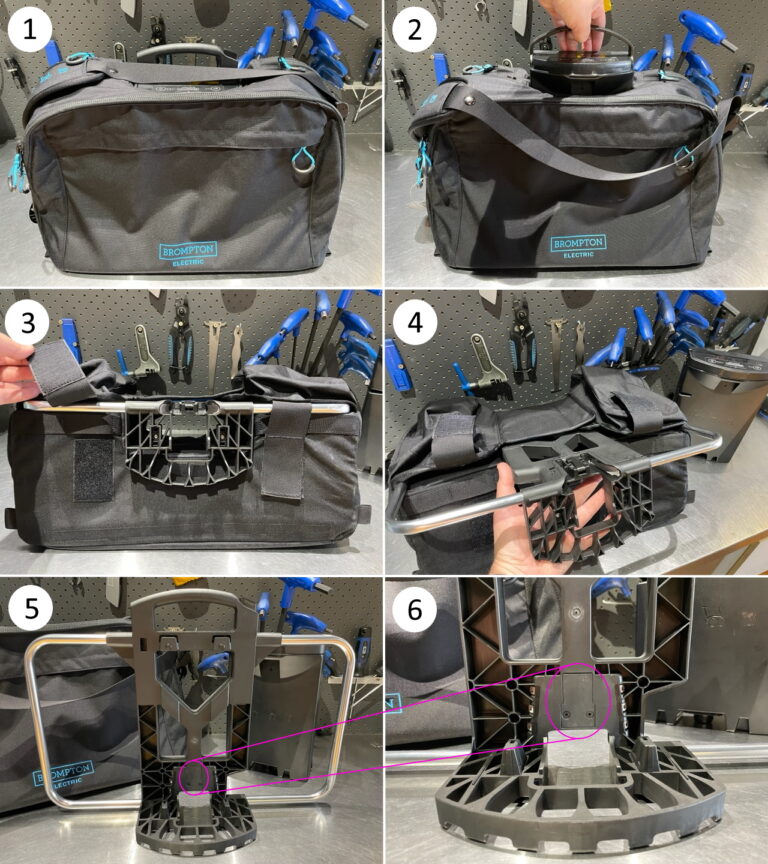
Step 1a – Remove the carrier frame from your bag (Essential Bag)
Remove the Essential Bag from your Brompton. (It will also be helpful to empty the contents of your front pocket.)
Release the shoulder strap. Lift battery handle to release it from the carrier frame.
Remove the battery from the bag and set aside (somewhere clean).
Release the press studs securing the Essential Bag (cover) to the carrier frame.
Lift the frame out of the cover. Set the cover aside.
This cover will need to be removed to access the frame catch:
Step 1b – Remove the carrier frame from your bag (City Bag)
Remove the City Bag from your Brompton.
Release the shoulder strap. Lift battery handle and remove from bag. Set aside (somewhere clean).
Release both Velcro straps at the bottom of the bag.
Slide carrier frame out of bag.
Set cover aside. Frame is now ready to work on.
You will need to access the circled section of frame in the next steps.
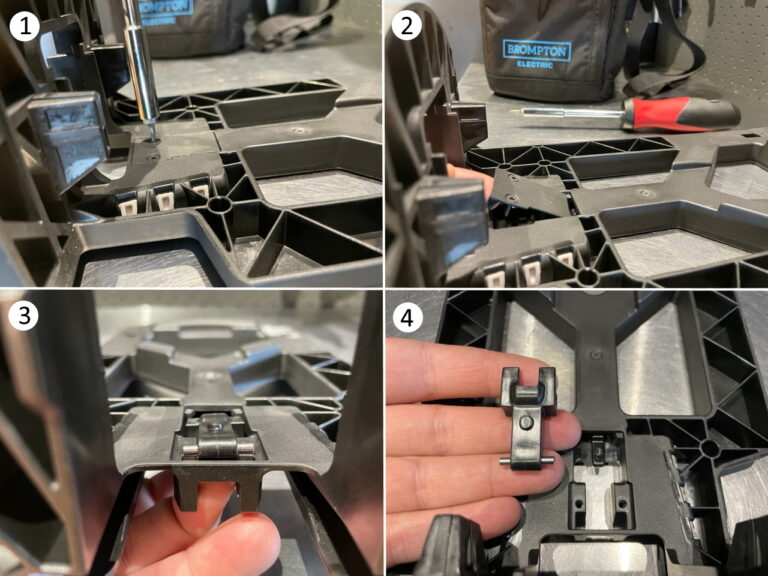
Note which is the “right way up” for when you insert the new catch. Push out the metal pin from the original catch to use in the replacement catch.
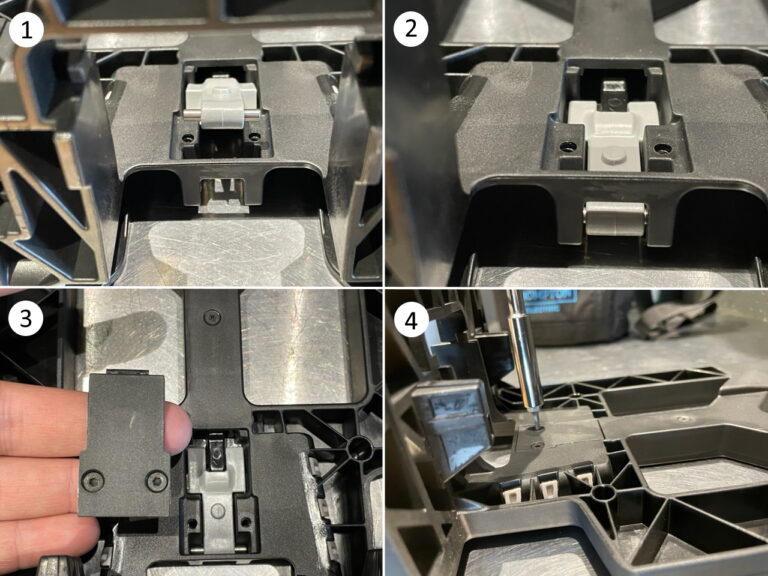
Step 3 – Fit replacement frame catch (Essential & City Bags)
Push the metal pin from the original catch into the replacement catch.
Position the replacement catch in the carrier frame. Check that the catch is the correct way up: the bulge and raised circle are facing up, and the flat side facing down.
Replace the cover, fitting the lip (at the top of the cover) into the frame first, then positioning the torx screws.
Tighten until screws are level with surface of carrier frame. If there is a bulge in the cover check that the catch is facing the correct way up as shown and described in step 2.
You can now refit your frame and battery into your Essential and/or City Bag. (Reverse order of process shown in Step 1a/1b)
Fitting the replacement Mudguard stay and flap
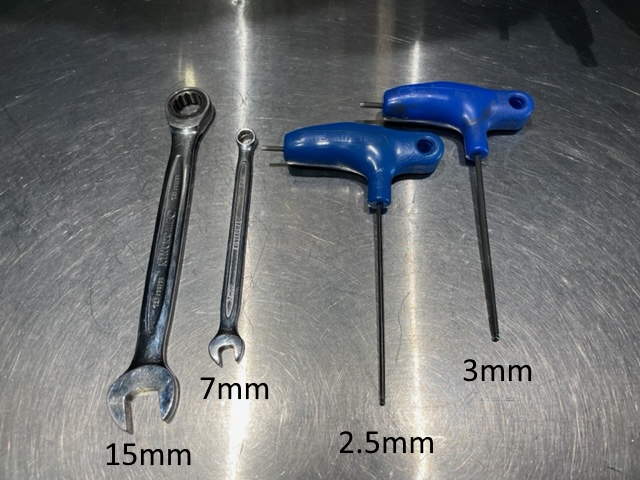
You will need the following tools:
15mm spanner
7mm spanner
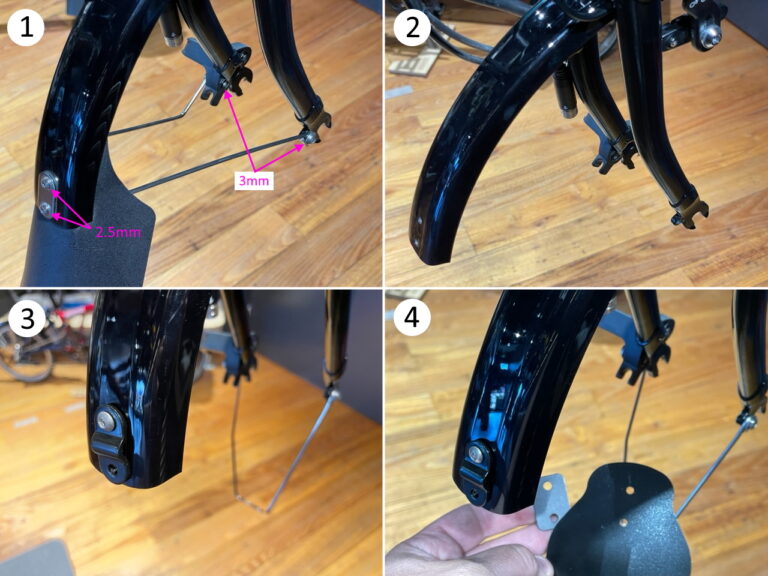
2.5mm allen key / hex tool
3mm allen key / hex tool
The kit contains:
a replacement mudguard stay (the side with the bend roughly half way along is the right hand side of the stay)
bolts (1 long, 1 short – both 3mm allen key) and washers to secure stay to the fork
a pair of smaller bolts (2.5mm allen key) and nuts (7mm spanner) to secure the stay and flap to the plastic mudguard blade
black bracket (metal)
replacement flap and backing plate (black plastic)
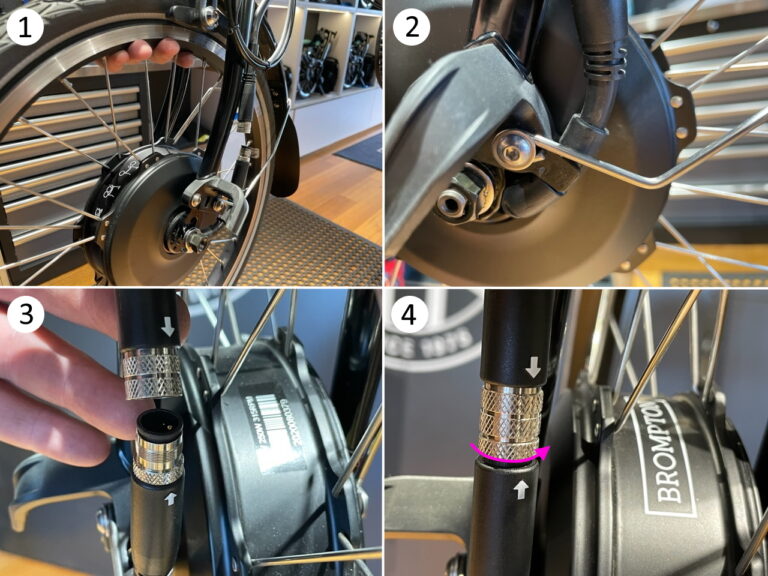
Step 1 – Remove front wheel (see also p46 of your Brompton Electric Owner’s Manual)
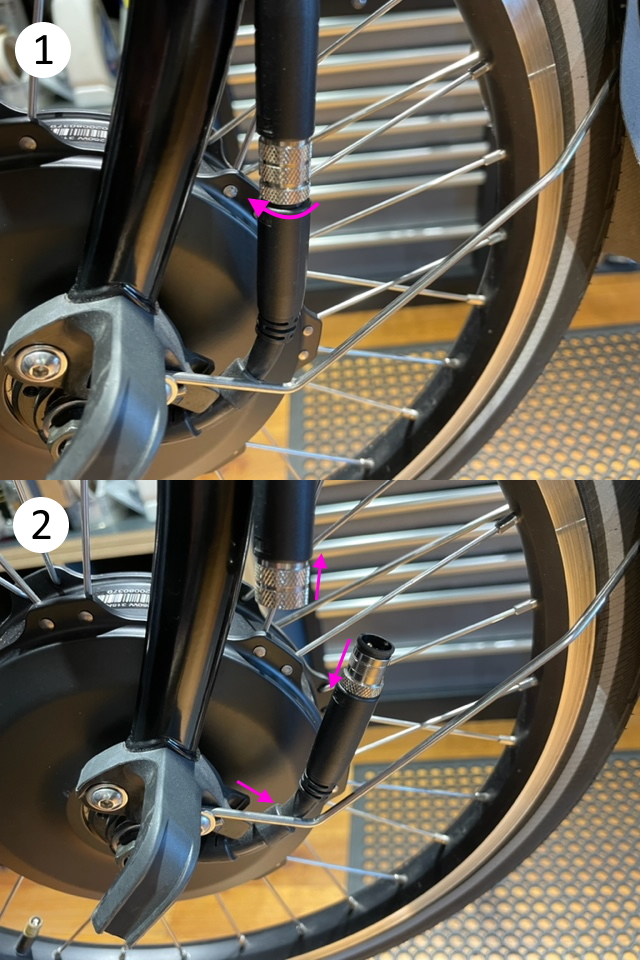
Disconnect the motor cable by unscrewing the last/bottom silver ring in the direction indicated.
Gently pull the connection apart. Release cable from clip on fork.
Deflate tyre pressure to allow tyre to pass between brake pads without adjusting brake callipers.
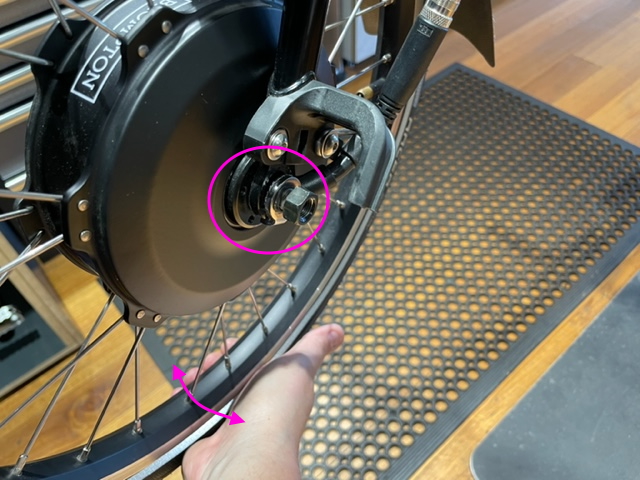
Use the 15mm spanner to loosen (or remove) axle nuts to allow the wheel to be removed from front forks.
If the washers don’t release easily by hand, you may need to gently wiggle the wheel to encourage the washers to come loose.
Step 2 – Replace mudguard stay and flap
Remove current mudguard stay, flap and fittings; these will not be required again.
You should now have the front fork and plastic mudguard blade ready to install the replacement parts.
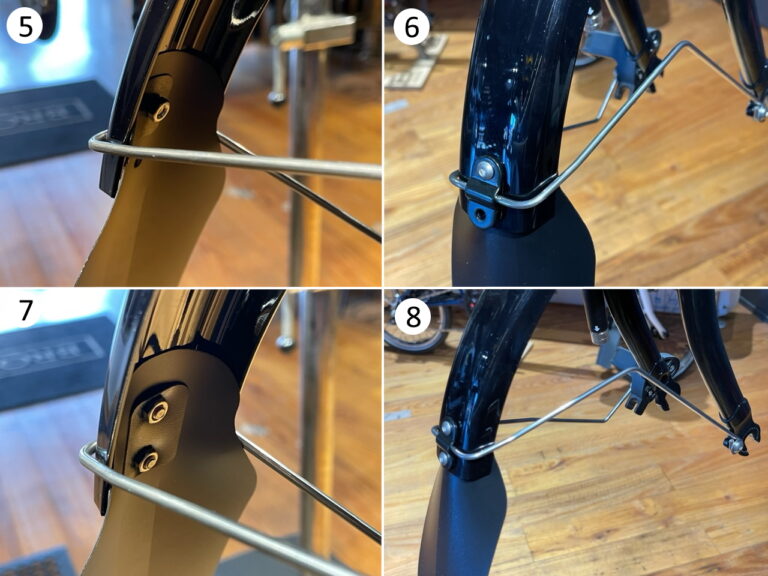
Lightly attach the stay to the forks (see image No 8 to check correct orientation). Place metal bracket and one small into the mudguard blade.
Line up the replacement flap and backing plate.
Fit onto the first screw and lightly fasten with a nut.
Position the stay between metal bracket and blade. The new stay is positioned on the outside of your mudguard blade.
Fit the second bolt and nut and secure both.
Tighten fork bolts. There shouldn’t be any play in the stay.
Step 3 – Refit front wheel (see also p47 of your Brompton Electric Owner’s Manual)
Before you refit the front wheel:
Ensure the motor cable is in the correct position in relation to the drop out. Never try to spin this cable anti-clockwise; drop the wheel out of the fork and reposition the wheel if the cable has moved out of position.
The axle has flat sides; when lined up correctly the axle will slide smoothly up into the fork’s drop outs.
The tabs on the washers face down on the Brompton Electric.
Squeeze the tyre past the brake pads. Locate the flat sides of the axle in the fork drop outs. Ensure the wheel is straight and located fully up into the drop outs (if you’re not using a stand you can use gravity to assist you, just ensure the wheel is centred properly in the fork). Tighten the axle nuts very firmly (18Nm if you have a torque wrench).
Secure the motor cable back into the plastic clip.
Use the arrows to align each end of the motor cable. Once lined up, the connection should be easy and snug.
Lift and turn the lower silver ring (to the right) to secure the connection. Don’t over-tighten.
Don’t forget to inflate your front tyre when you’re done. Schwalbe recommend 65-110psi, however most of our customers find somewhere between 80-100psi comfortable for them. Under-inflation is the most common causes of punctures we see so remember to check your tyre pressure on a regular basis.
Lastly…
Check your brake pads are contacting your rim (braking surface) evenly, particularly when you steer to the right (you might need to realign your brakes.)
Check there is no wobble in your front wheel (you might need to reset your front wheel in the forks, or re-seat the tyre bead in the rim).
